
Do you run, or market a business that attracts customers from the local area? Would you like to consistently increase the number of leads and customers you bring in? Then Facebook ads can really help!
Read on to find out 3 Facebook ad strategies that work really well for small local businesses, that are quick and easy to set up.
- Boost post
Let’s start with the simplest way to get your name out there in front of your target audience – and that’s using the Facebook ‘boost post’ option. Make no mistake – if you run a ‘boost post’ then you are actually running a Facebook ad, it’s just that Facebook present this ‘entry level’ to their ads platform separately from their main ads interface.
Virtually every time you create a post on your Facebook Page, you will see the blue ‘boost post’ button appear, encouraging you to get that post shared with a wider audience. (Facebook have recently removed the ‘boost’ ability from some types of post – as outlined here.)
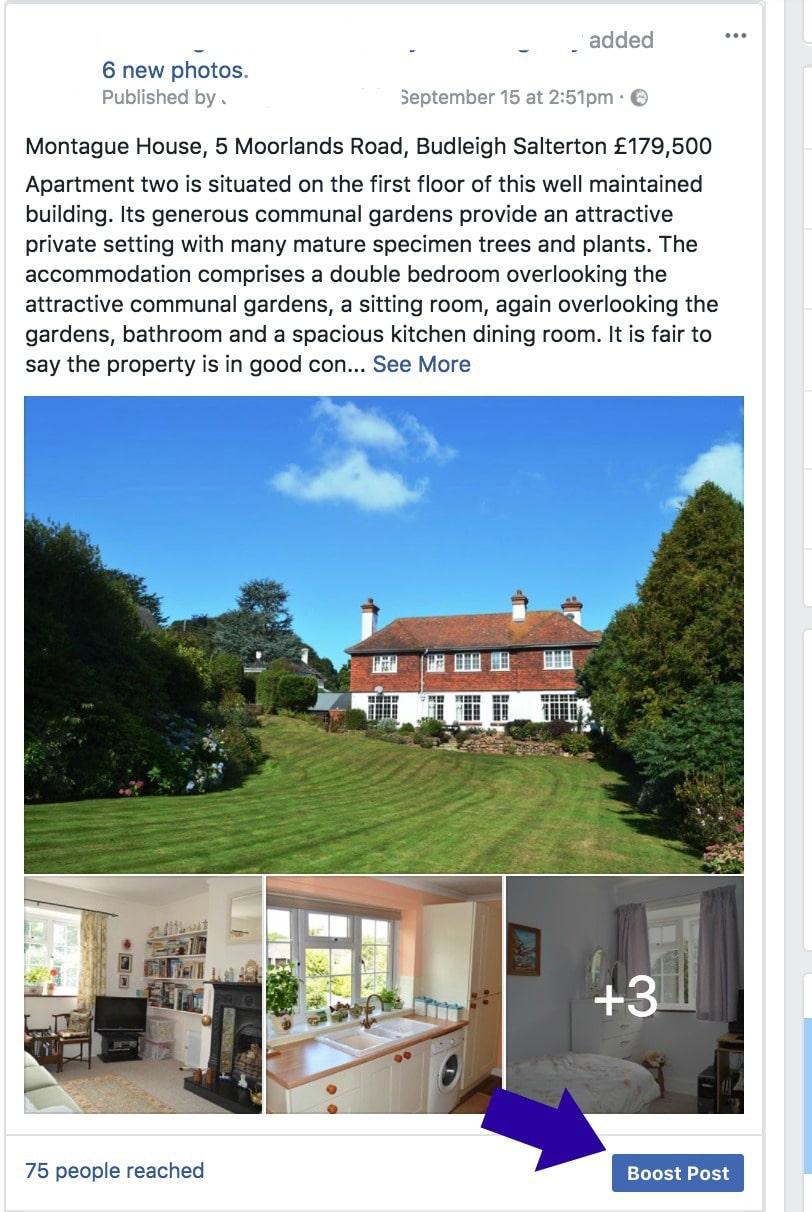
The ‘boost post’ button shows up under most posts.
You can set up a ‘boost’ for your post in about 2 minutes, so it’s a quick and easy way to remind your local audience that you’re there, or to promote a special offer, event, or new range, for example. (It’s also an easy way to keep ‘top of mind’ by regularly sharing a range of content, such as useful hints and tips, stories about fund-raising efforts, or (interesting) news about your industry, for example. However, for the purposes of this article, we’ll concentrate on creating posts that promote an offer or event.)
Setting up your boosted post.
Creating a promotion this way requires 2 things – a. sharing a post on your Page that will encourage people to take the action you want; and b. boosting that post so that it gets seen by a wider audience than usual.
(Before your create your post, make sure you’re aware of Facebook’s advertising policies, so that you can ensure your content will comply.)
a. Create your post
When you’re creating your post, think about your local audience and what they are likely to respond to. Mention the name of the area or city you’re targeting in your post to appeal to local customers and attract their attention in the newsfeed.
Use an image that is attractive and stands out, without being garish. If it makes sense to do so in the context of your post, use an image of your store-front, your logo, your staff, or a local view, to spark that buzz of recognition from your audience.
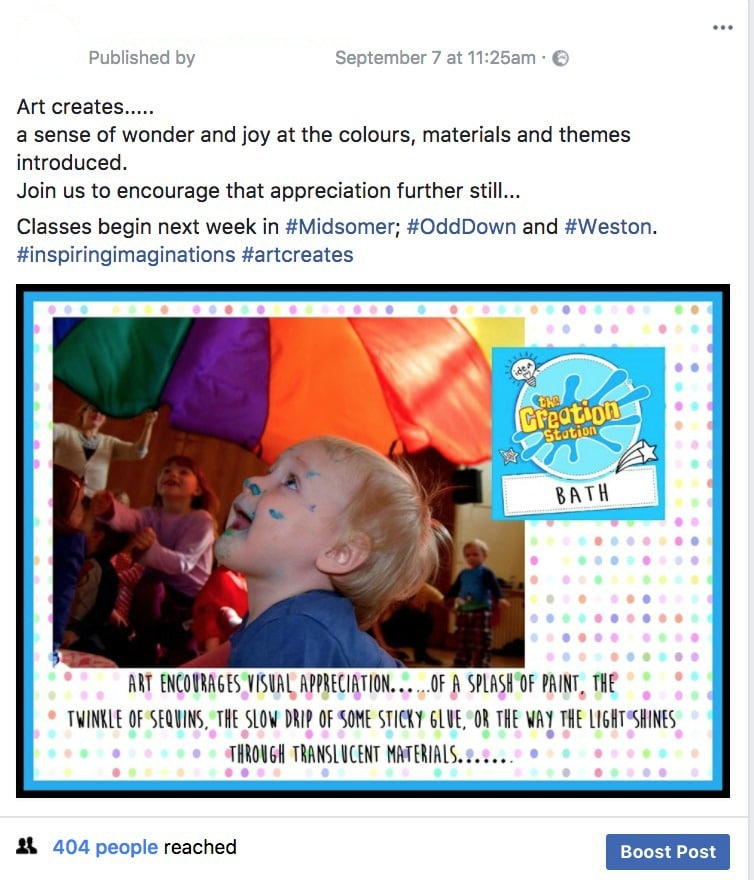
Including your logo in a post for boosting can help raise brand awareness and instil familiarity.
Although single images work well, consider changing it up by using the other media options available when you create a post.
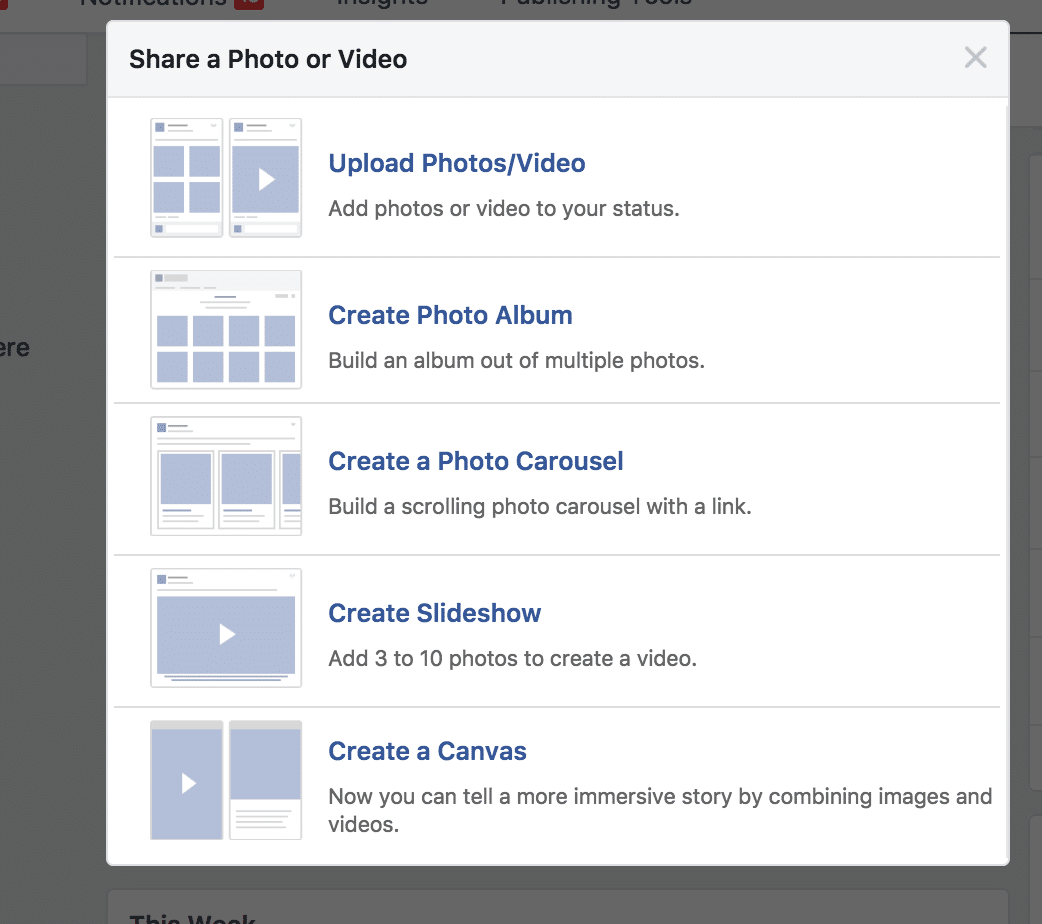
When creating your post for boosting, you can choose from several media options. Don’t always stick with a single image.
You have the option to use a video (a simple one recorded on your phone is fine), to create a carousel post with up to … images, or to create a slideshow from up to 10 of your own images. Each of these options will allow you to tell more of your story and will allow you to showcase a range of products or services.
If you choose to create a carousel post, Facebook will pull images in from your website, or you can upload images directly:
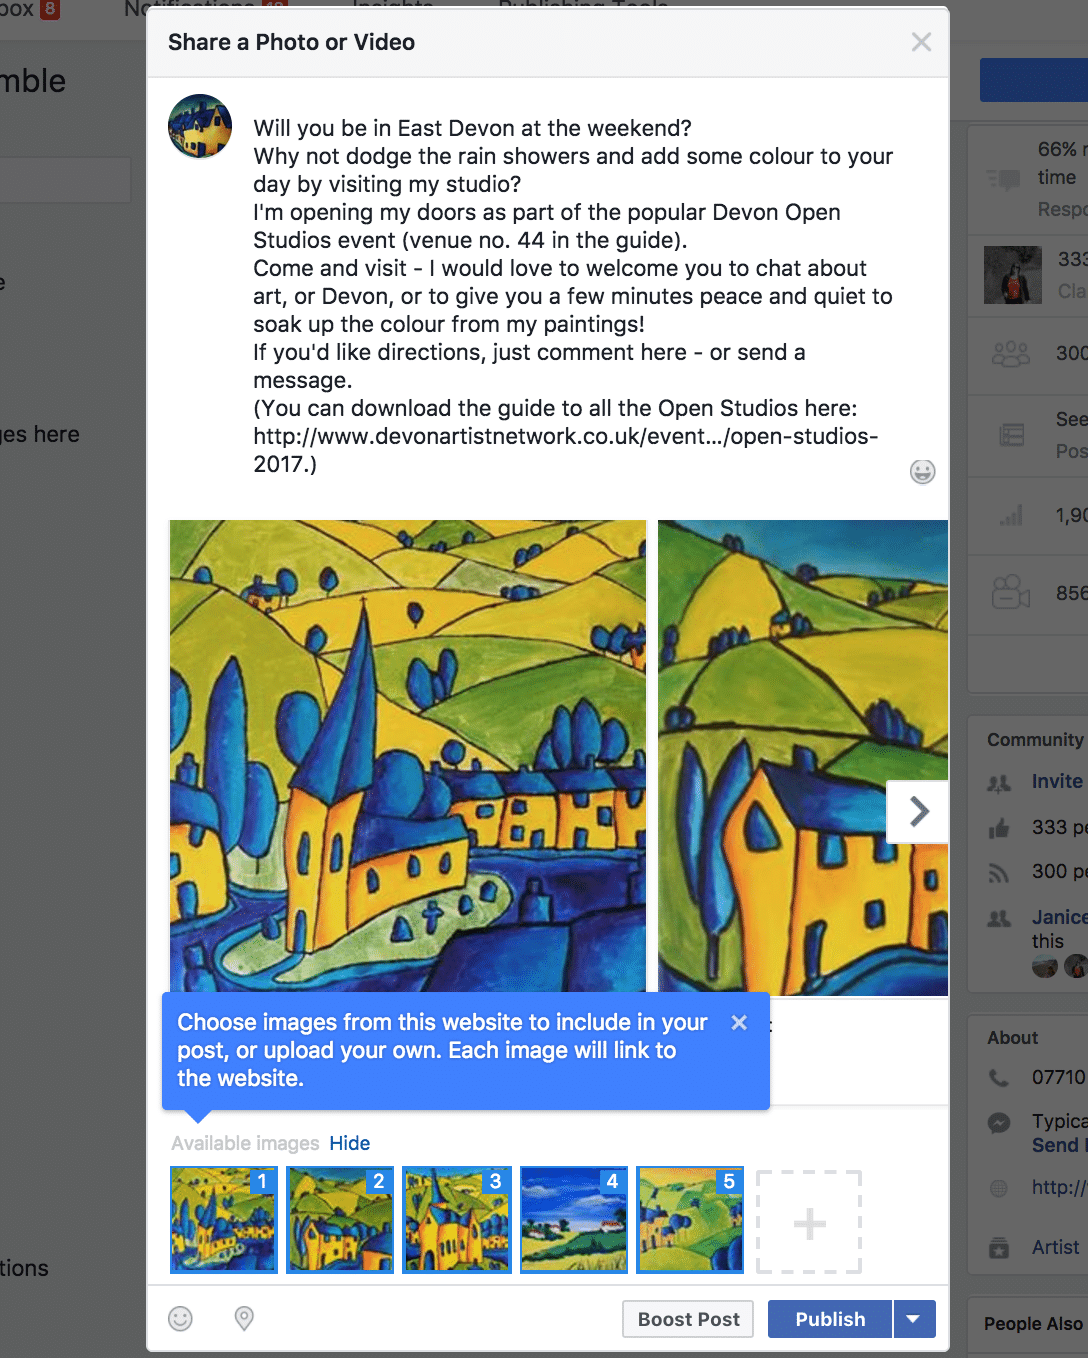
Creating a carousel post allows you to tell a story or to showcase your products, or services.
Creating a slideshow is a great way to take advantage of the attention-pull of video, without having to actually go and make a video from scratch! Best of all, it takes only minutes to do!
Creating a slideshow post is very easy – you can either upload your own photos or use photos already shared on your Page.
Once again, you have the option to upload photos directly, or use photos that you have already shared on your timeline, or have been tagged in.
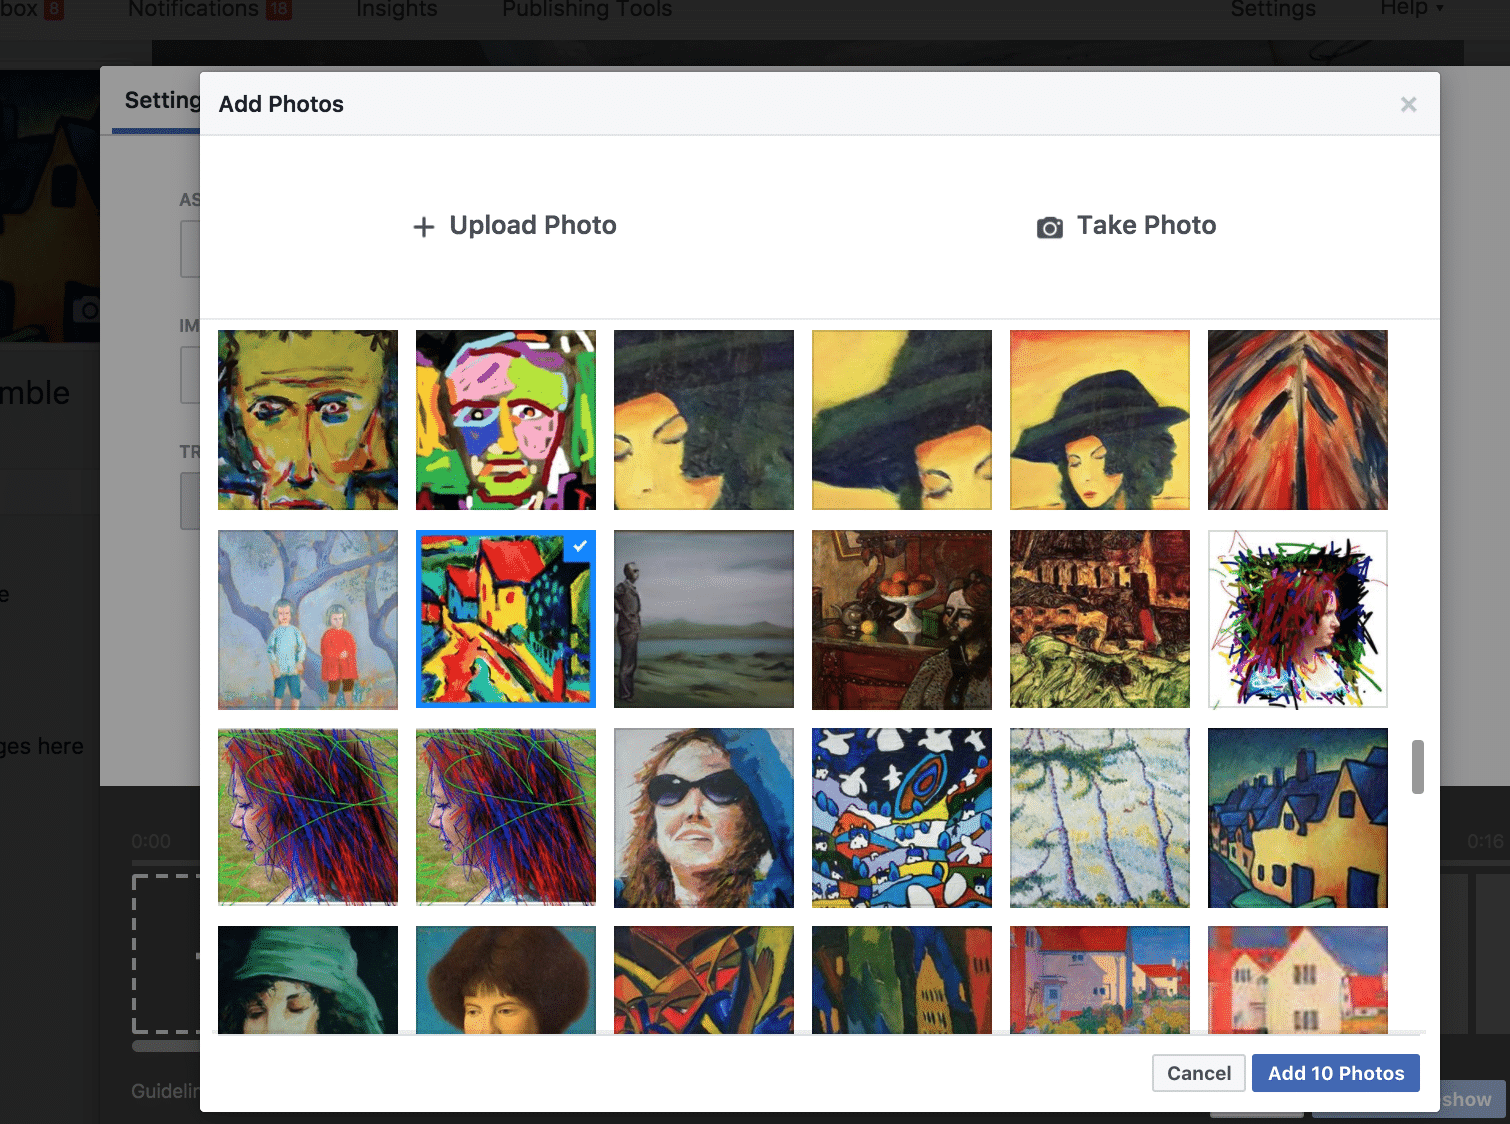
Facebook makes it easy for you to create a slideshow from photos you’ve already shared on your Page.
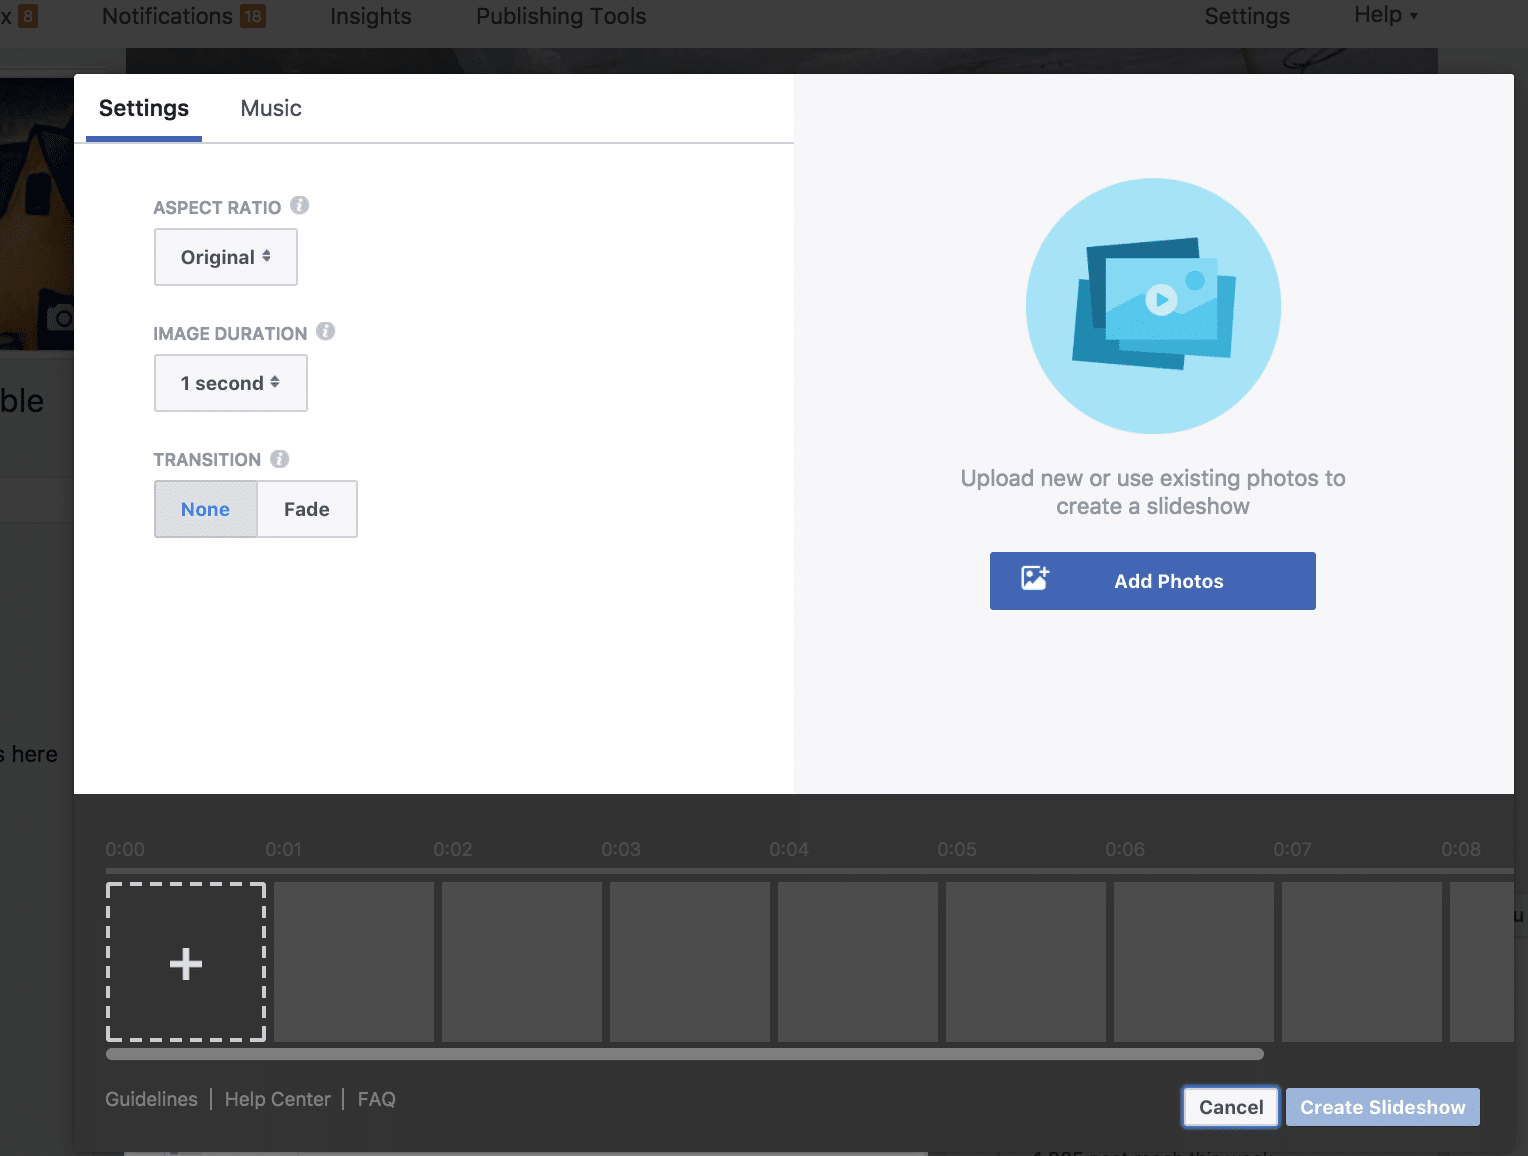
The basic editing functions allow you to easily customise your video:
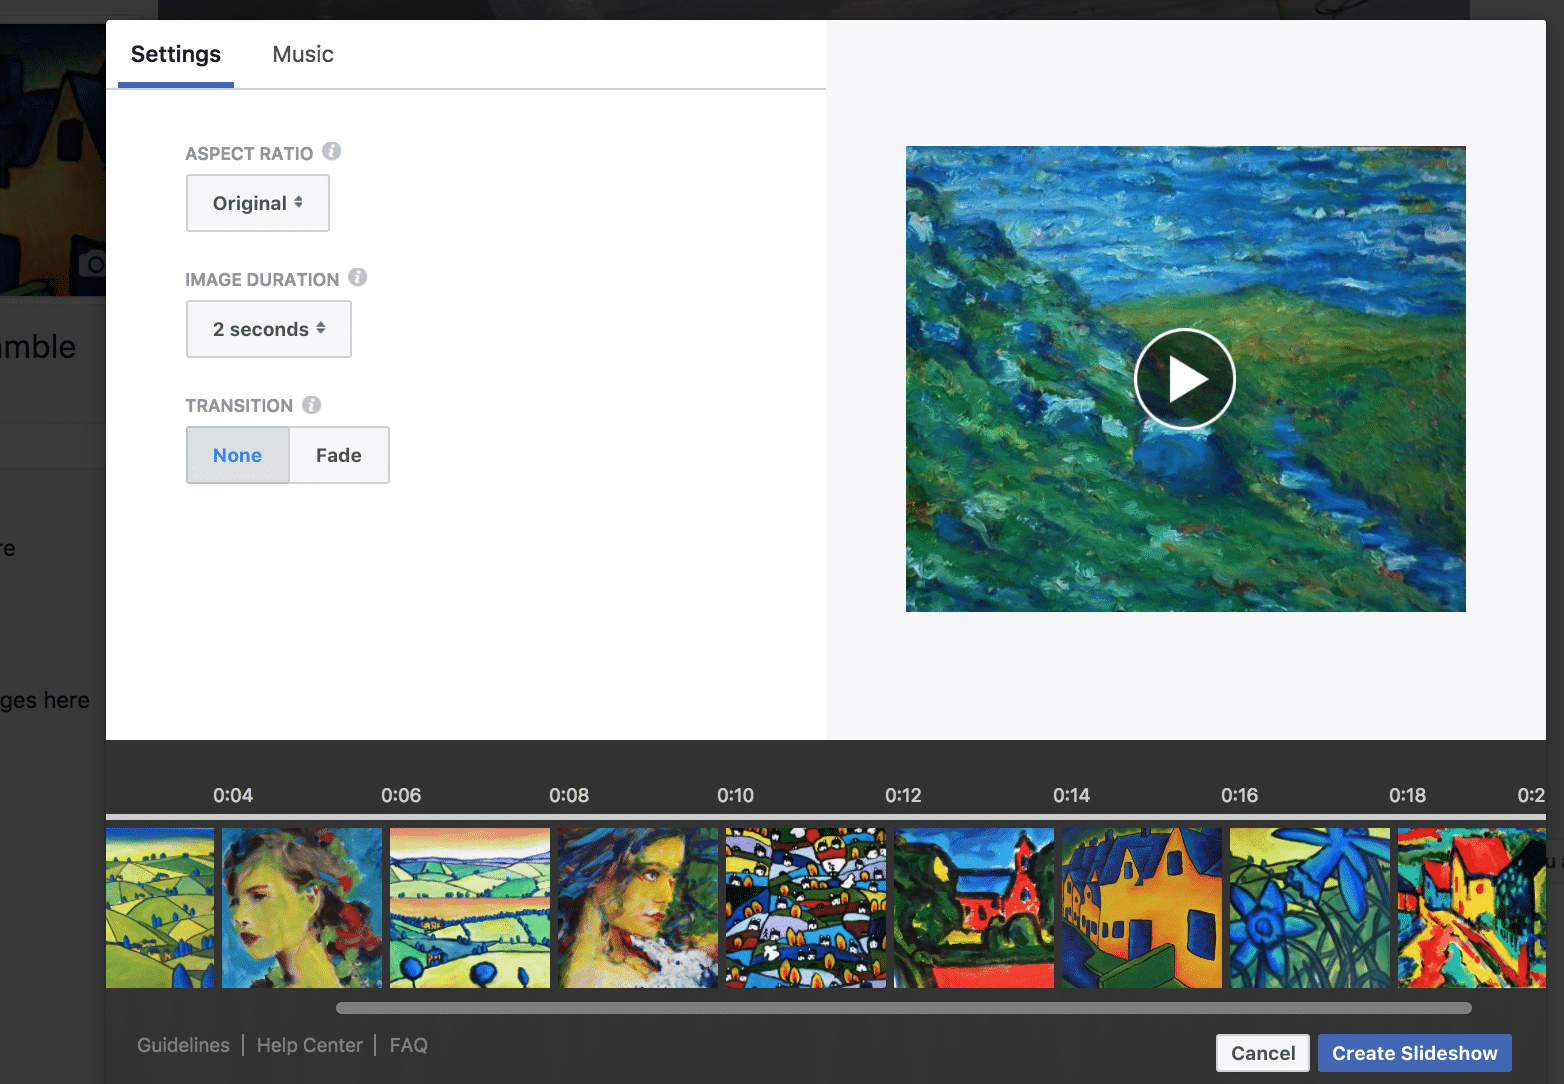
Facebook allows you to edit your slideshow image duration and transitions.
(Once it’s been published, you can also download your slideshow video from Facebook to use elsewhere in your marketing!).
b. Set up your boosted post
To set up a ‘boost post’, simply click the blue button that appears beneath your post and then work through the options that Facebook provide for targeting, budget and duration of the promotion.
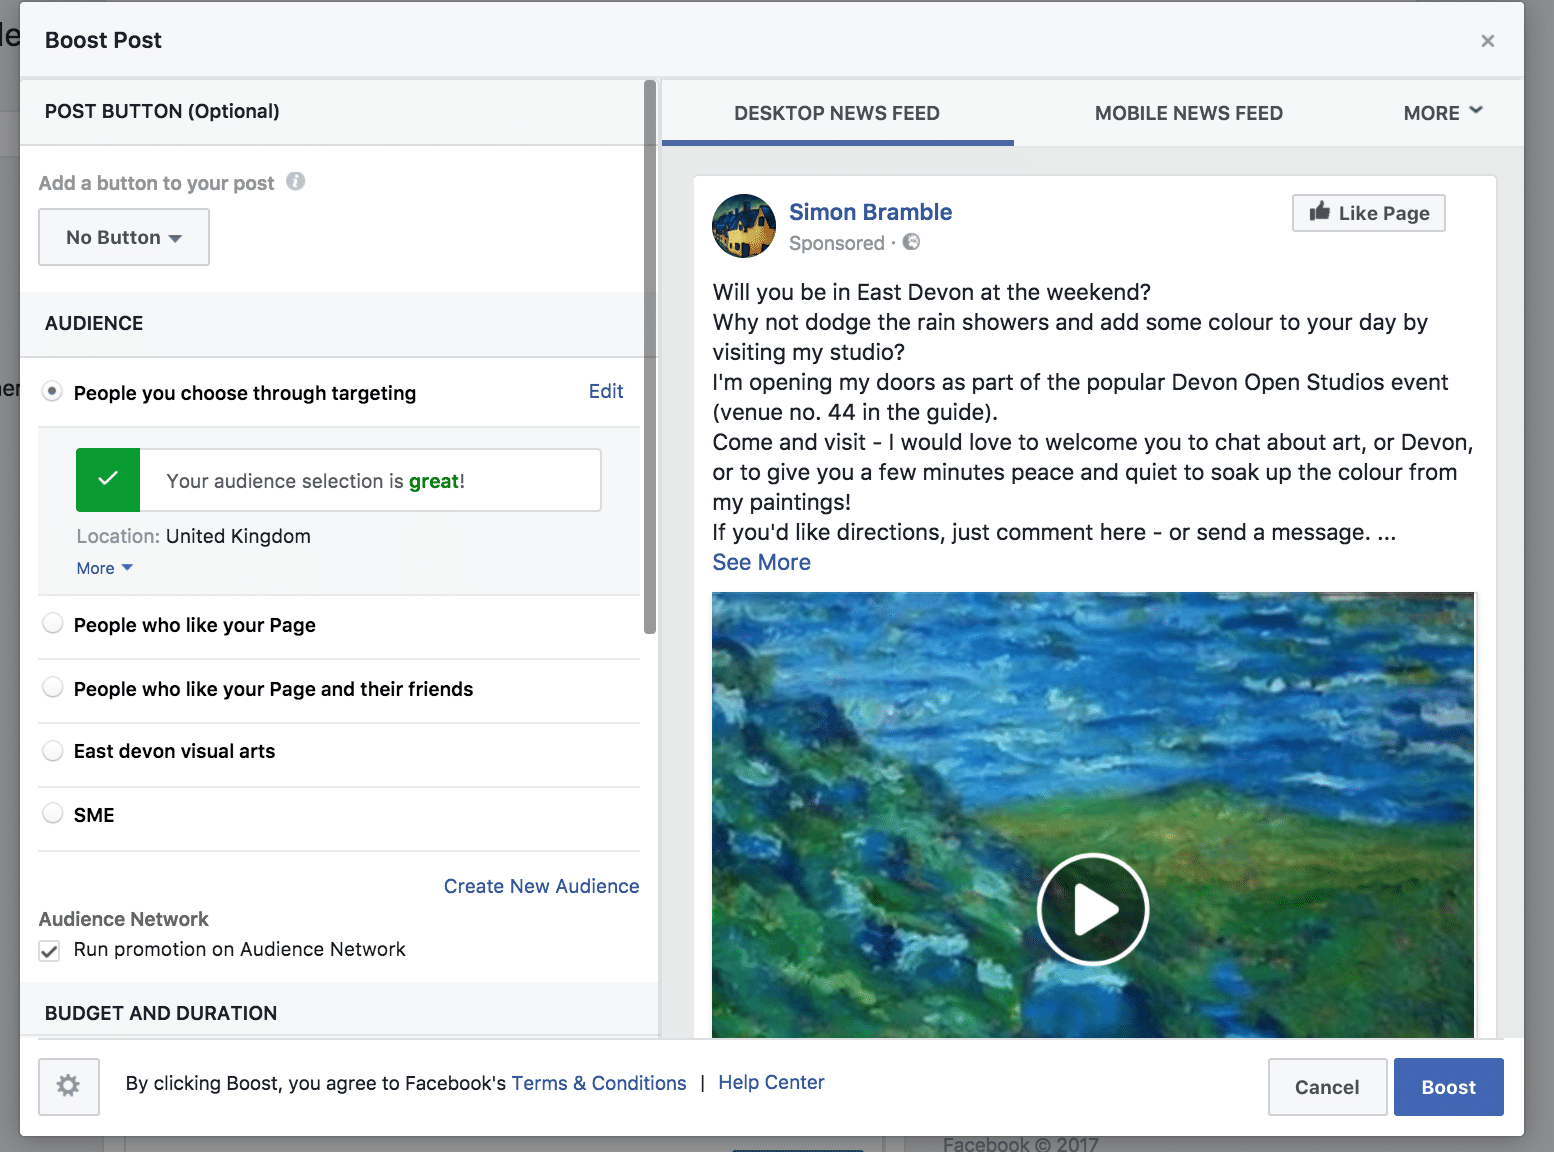 Facebook makes it easy to set up a ‘boost post’ by walking you through the options.
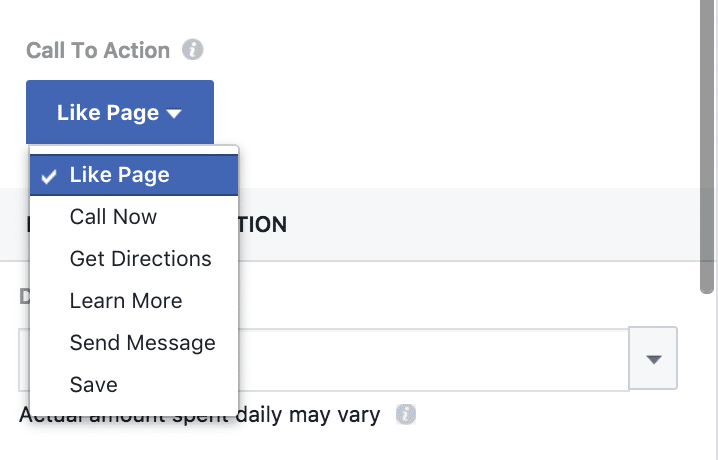
You can add a call-to-action button to your post that either links to your website, or links to Messenger, making it easy for people to message your Page:

You can select a call-to-action button for your boost post, to tie in with the results you want to achieve.
You can choose who to target with your boosted post, selecting first the age and gender before focussing on location. (If you give this audience a name, it will be saved for future use.)
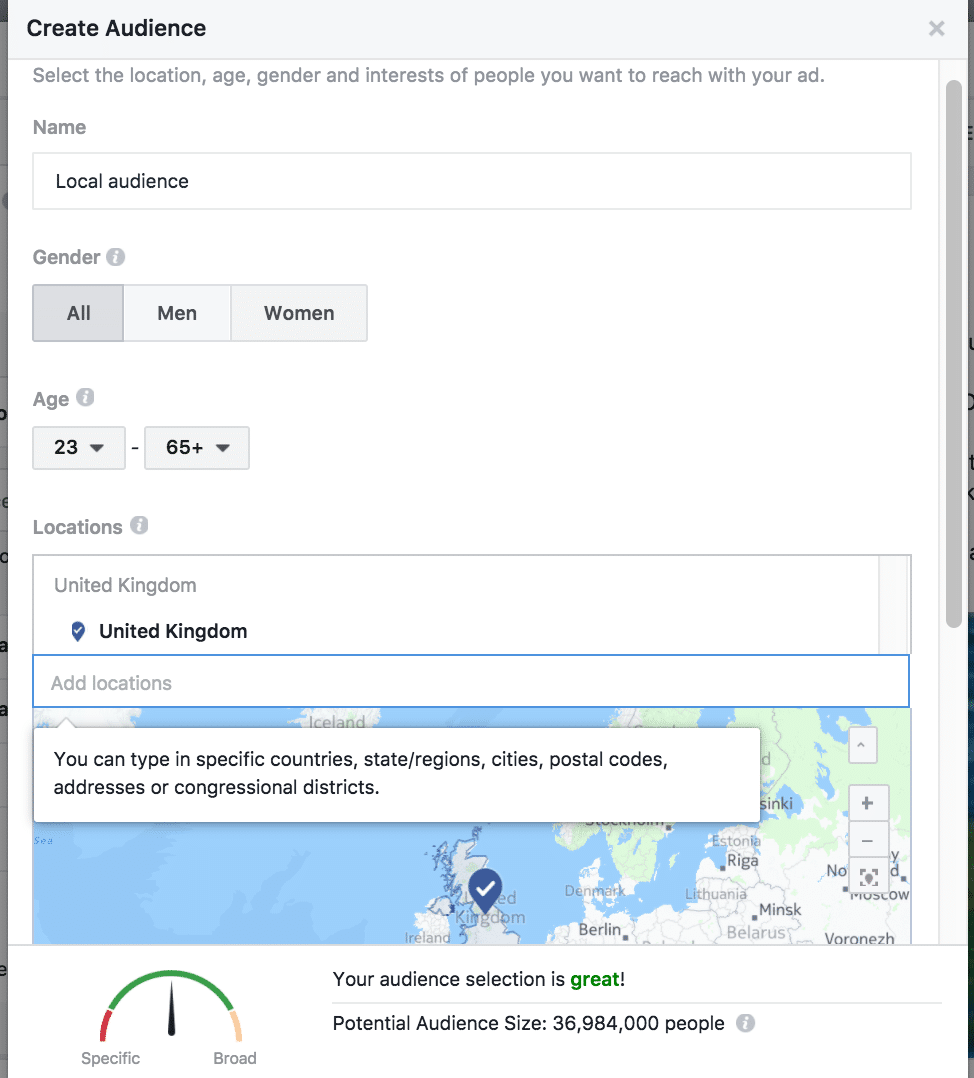
Facebook allows you to target your boost post ad to specific locations.
Select the location you want your ad to be served to either by typing in a place name, address, postcode, or by ‘dropping a pin’ onto the map provided.
You can then choose the distance from that location that you want included. (Note that you can also exclude specific locations at this stage which can be useful if, for example, your business is a franchise and you don’t want your ad to appear to people within a neighbouring territory.)
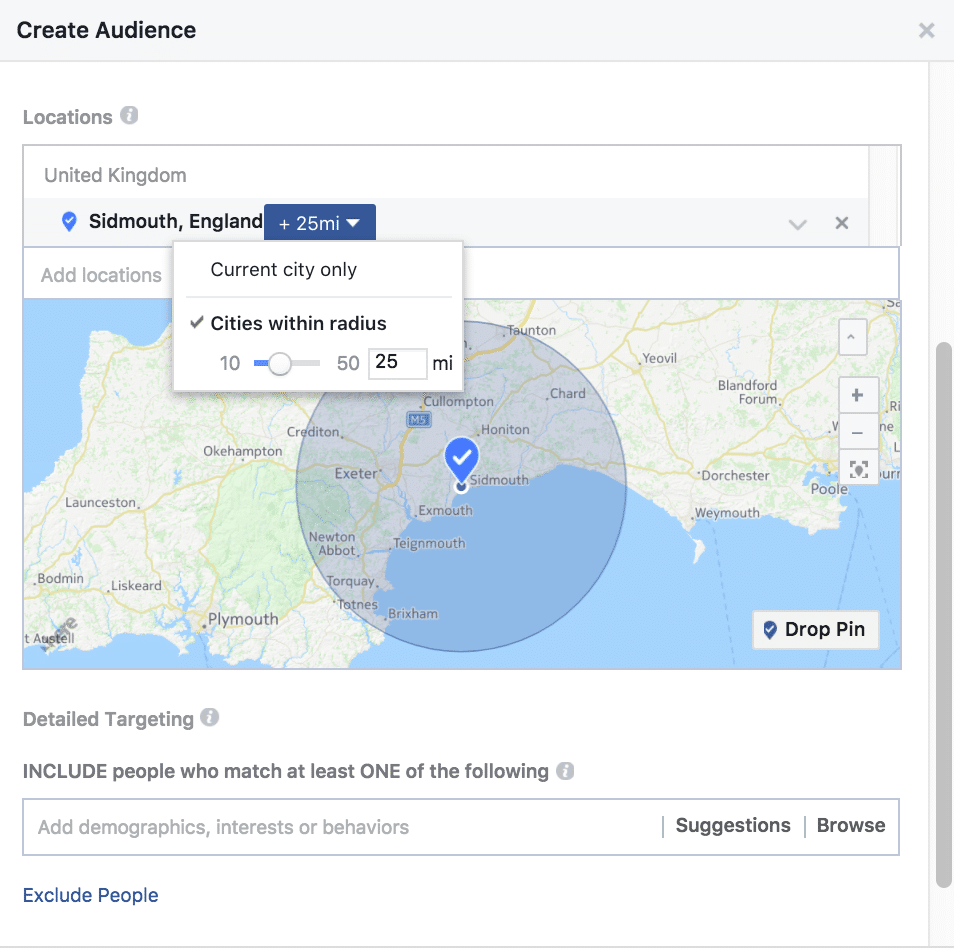 You can specify the radius of the area that you want your boost post to cover.
Facebook offers the opportunity to layer specific interest filters on top of the local targeting you have selected, meaning you can get your boost post in front of only the people who are likely to be interested in your business.
Choose a budget from one of the default options or type in your own:
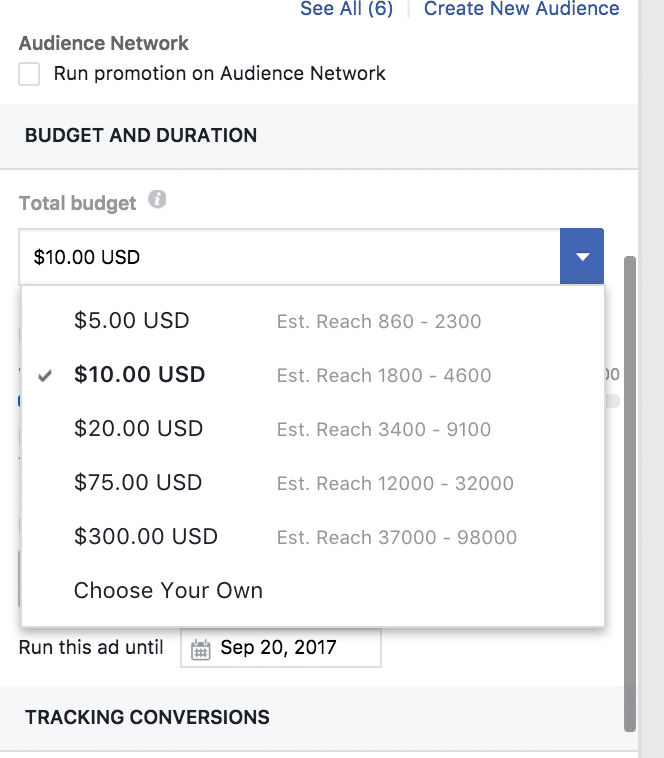
You can manually set a budget for your boost post.
If you haven’t run Facebook ads for your local business before, or you’re unsure of what budget to set, just choose one of the lowest levels and review your results. You might be pleasantly surprised! You can always run another boost with a higher budget if you want more of your audience to see your post, or to see it more times.
Depending on the type of post created, you will get the option to display your post on desktop, mobile and/ or Instagram placements. You’ll notice that you also get the option to have your ads displayed on ‘audience networks’ by default. These are websites external to Facebook that they have partnered with. Untick the box if you don’t want your ad displayed there.
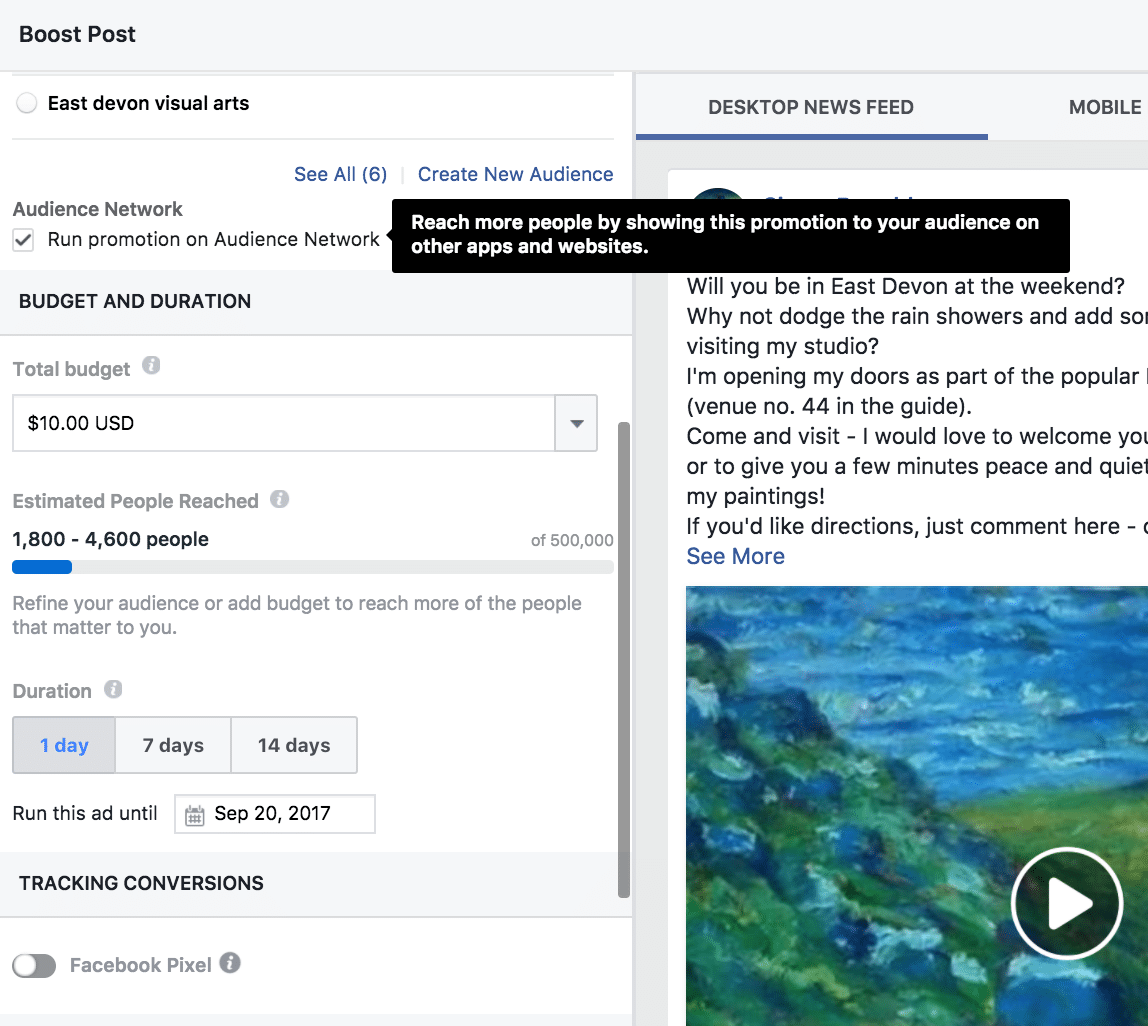
Choose whether you want your ad appearing on websites external to Facebook or not.
Finally, check the duration of your ad – either select a default option or customise the end date using the calendar:
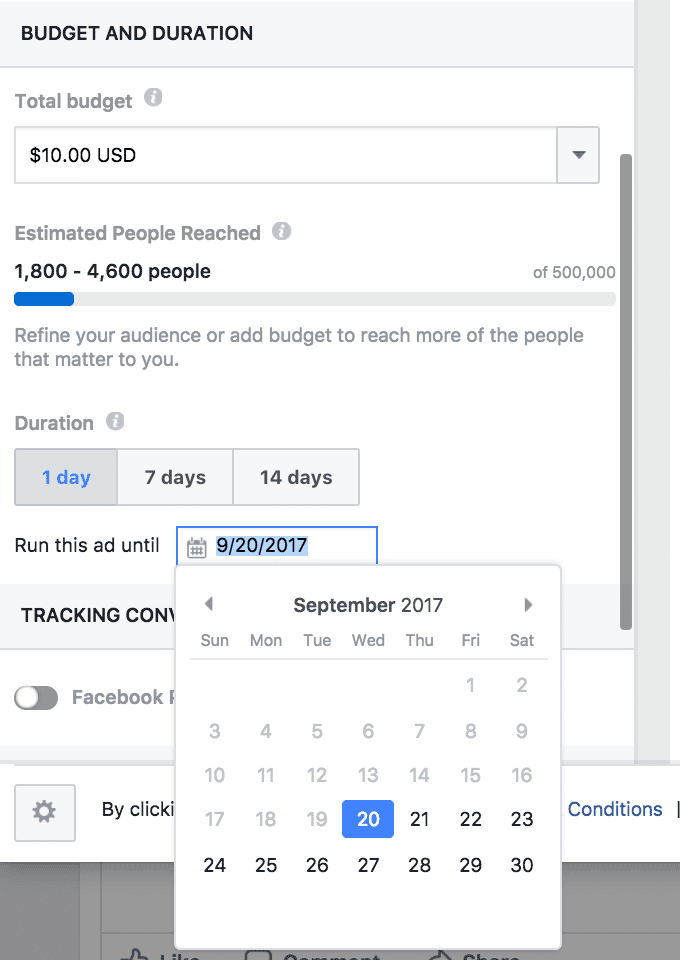
You can manually set the end date for your boost post promotion.
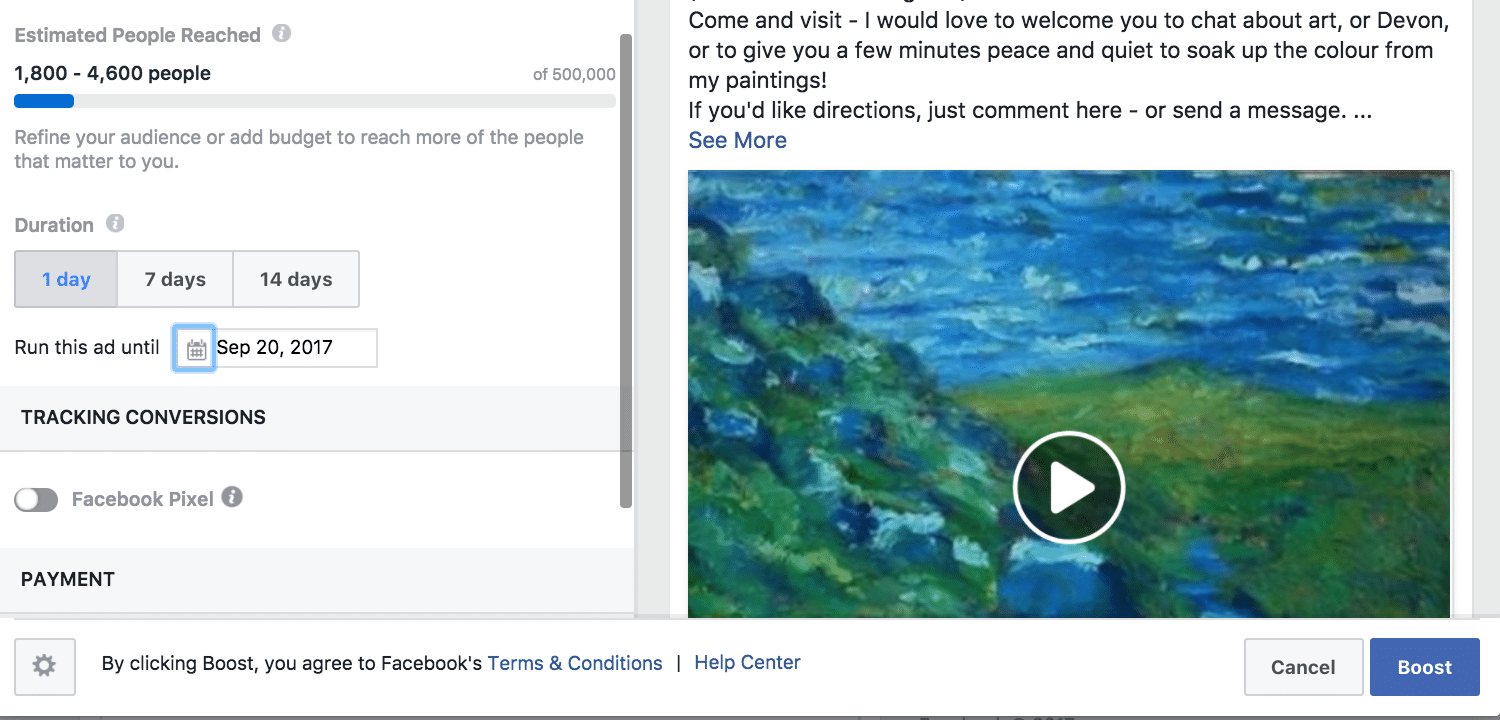
The last step is to set your boost post live!
Click the ‘Boost’ button and that’s it!
Your boosted post is now set up – you will get notified when it’s been reviewed and approved, and is active.
For extra impact, why not consider combining a special offer with a boosted post? Facebook provides the option to easily create offers – and boosting your offer post to your local audience will drive awareness and sales! For more details check out this article .
- Local business promotion
Creating a local business promotion (this used to be called a local business awareness ad) may often be a better alternative to a boost post for a local business, but as it’s an option that’s not so prominently displayed, it can often be overlooked.
The reason for using a local business promotion is this, to quote Facebook –
“Boosting a post may help you get more people to like, share and comment on the posts you create.”
(The source of the Facebook official guidance for boosted posts is here .)
In other words, Facebook will optimise a ‘boost post’ ad for engagement and will show it primarily to people who are most likely to respond to Facebook posts, within the audience you select.
However, as Facebook themselves state:
“Local business promotions are optimized for reach to deliver your ad to as many people as possible. ….
… Maximizing your reach is important, as most people who see Facebook ads, that go on to purchase products in a store, don’t click on ads. By focusing only on people who engage with ads, you’ll only be reaching a small fraction of your potential customers.”
(The official guidance for local business Facebook ads promotions or awareness ads on Facebook is here .)
So, if you are running boost posts as a way to get the word out about your local business, you could actually be missing out on reaching the very audience you want to attract! To make sure you reach people who don’t necessarily respond to posts, you need to run local business promotion ads.
Setting up a local business promotion is just as easy as setting up a boost post. Although you can do it by using the Ads Manager and selecting the ‘reach’ objective, you can also set an ad up directly from your Page, just like a boost post. Either go to the Page menu on the left and click on ‘Promote’ ,
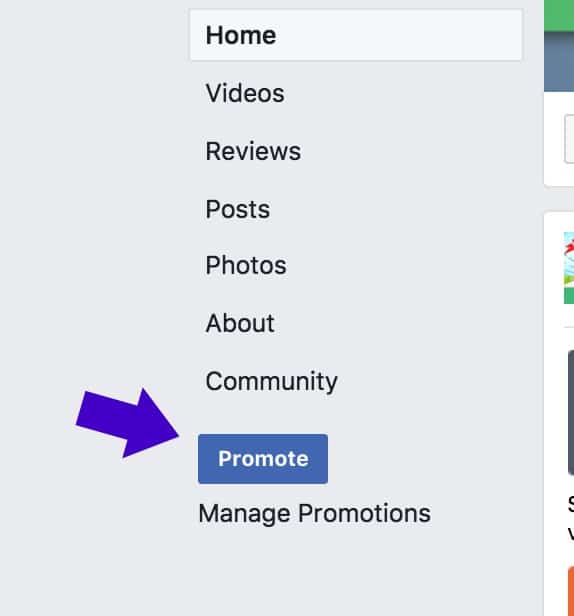
You can set up a local business Facebook ad promotion from the side menu on your Page.
or click on ‘advertise your business’ in the page post options:

You can also set up a local business promotion from the Page post options – choose ‘advertise your business.
There is a big advantage to setting your local business promotion Facebook ad up directly from the Page – and that is that the call- to- action button options are different from those available in Ads Manager. The Page-based buttons are specifically geared to driving sales and enquiries.
(However, the ad creative is restricted to a single image when setting up directly from a Page, whereas using Ads Manager for creating a local business Facebook ad will allow you the full range of media options.)
When you’ve clicked ‘Promote’, choose the top option from the menu that appears:
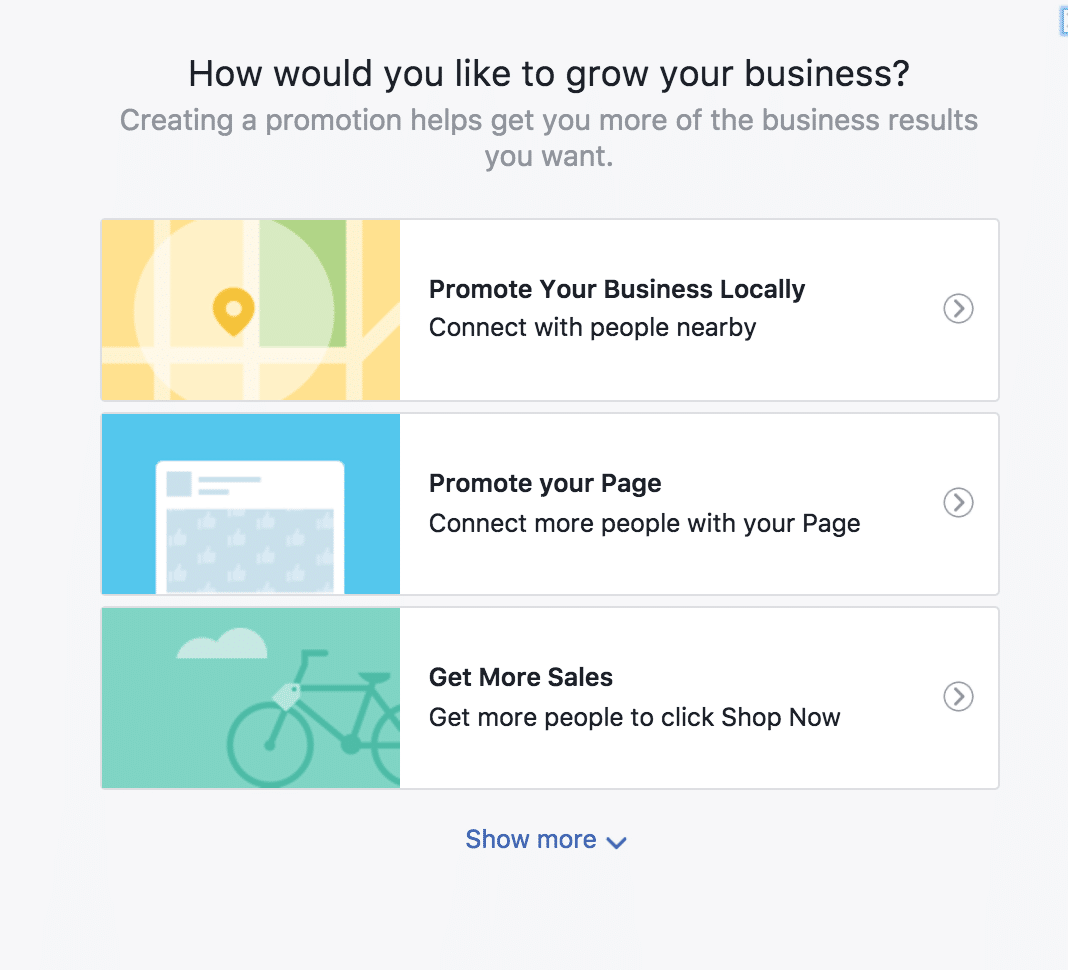
Choose the ‘Promote Your Business Locally’ option to set up a local business promotion.
The first step is to choose the location you want to target. You can change the local area selected by dragging the circle. You can also change the radius of the area covered:
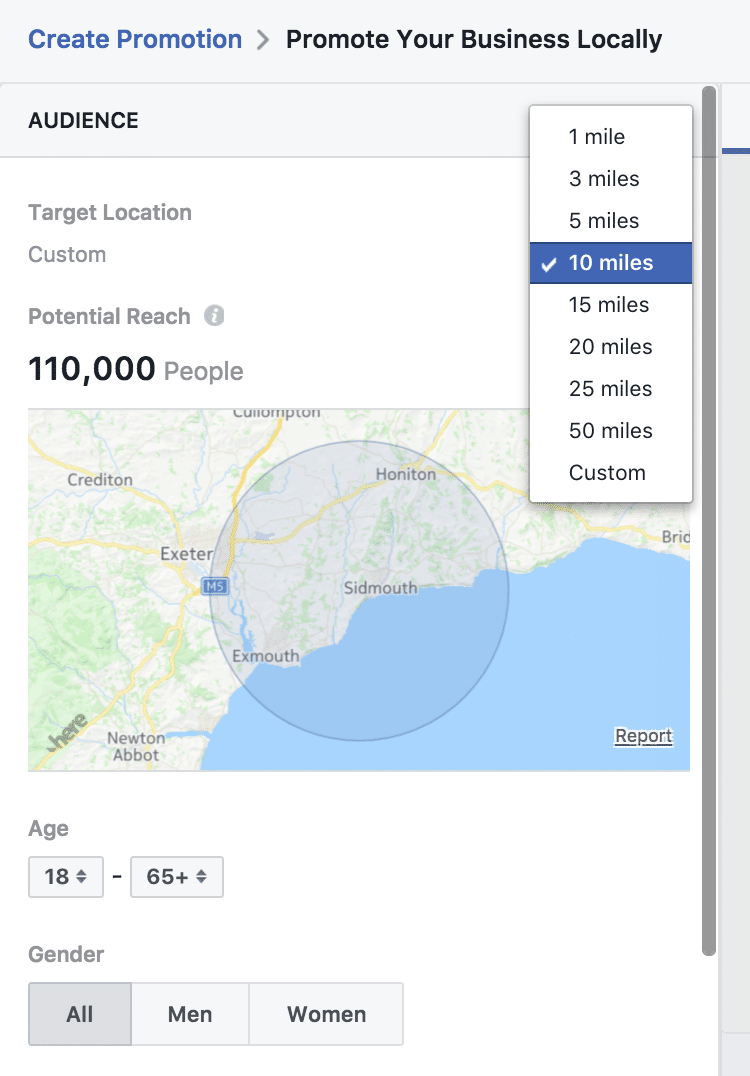
You can choose a specific location for your local business promotion with Facebook ads – and customise the radius reached.
Then select your audience targeting in a similar way to setting up a boost post.
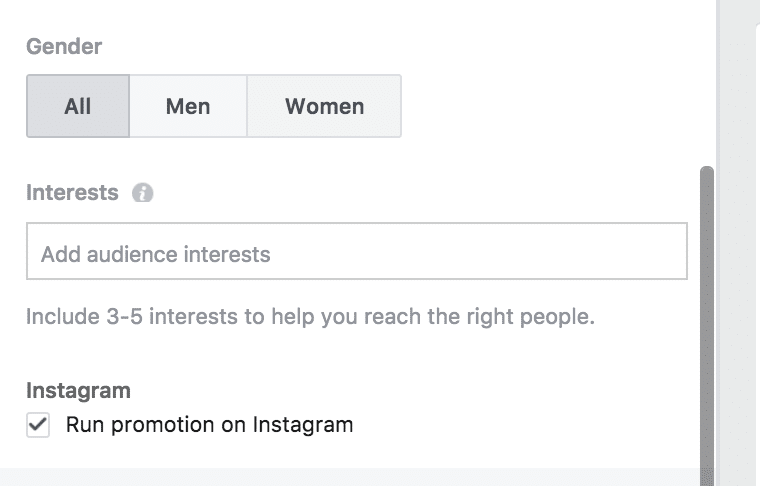
Choose whether you want your local business promotion to appear on Instagram.
(You can choose to run your local business promotion with Instagram ads as well as Facebook ads.)
Next comes the creative, or the ad itself. You’ll see that Facebook pre-populates this with text and an image drawn from your cover photo and page description, but you will need to edit this to create an ad that drives results.
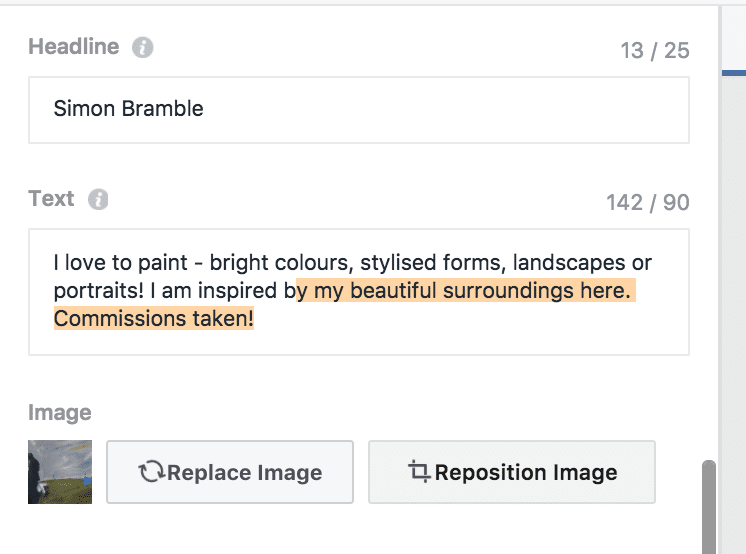
The text in your local business promotion creative is limited to 25 and 90 characters.
Note that you are limited to 25 characters for the headline and 90 characters for the text. Previews of how your ad will appear on desktop, mobile and Instagram are offered on the right hand side.
You can then choose a call-to-action button. These are unique for this ad type as they will take the visitor directly to the action selected – for example, clicking ‘call now’ will take them straight to making a call to you on their phone.
Local business promotion call-to-action buttons are especially designed to drive more sales, enquiries and footfall.
Tapping ‘get directions’ will take your visitors to a map and directions to your business; ‘save’ will allow them to save the location so they can easily visit another time.
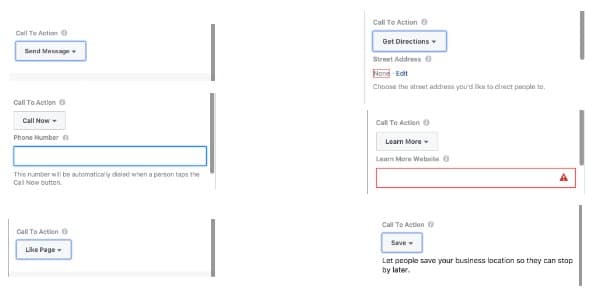
The local business promotion call-to-action buttons will each deliver a specific result for your business – as shown here.
Setting the budget and duration for your business promotion ad is the same as described earlier for a boosted post.
Once you’re happy with your ad, click the ‘Promote’ button and your ad will go through the review process and then go live.
3. Use a Facebook Messenger bot
Facebook Messenger bots have been available for a while now (see this article for more in-depth information.) They offer amazin
g potential for marketing as a visitor can subscribe to your Page with just one click. You can then send them information and updates from your Page via Messenger (within the boundaries outlined in Facebook’s policies.) Not only is this a very convenient and simple way to send vouchers, or news of a launch or special offer, but the open, read and click-through rates for messages sent this way are huge, compared with the equivalent email open rates (check out experiments carried out by Hubspot here .)
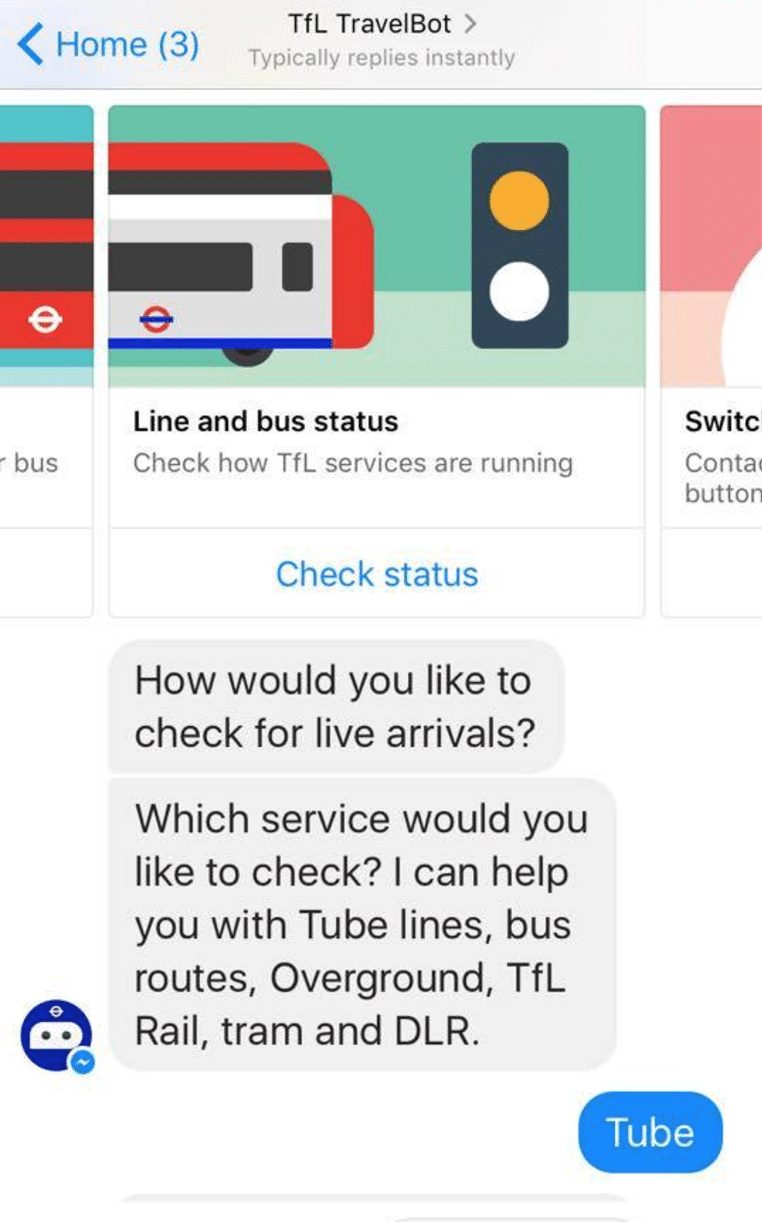
Travel for London uses a bot to help passengers check up-to-date train and bus timetables and routes.
However, many business owners either aren’t aware that this technology exists, or they think that it’s too complex for them to use.
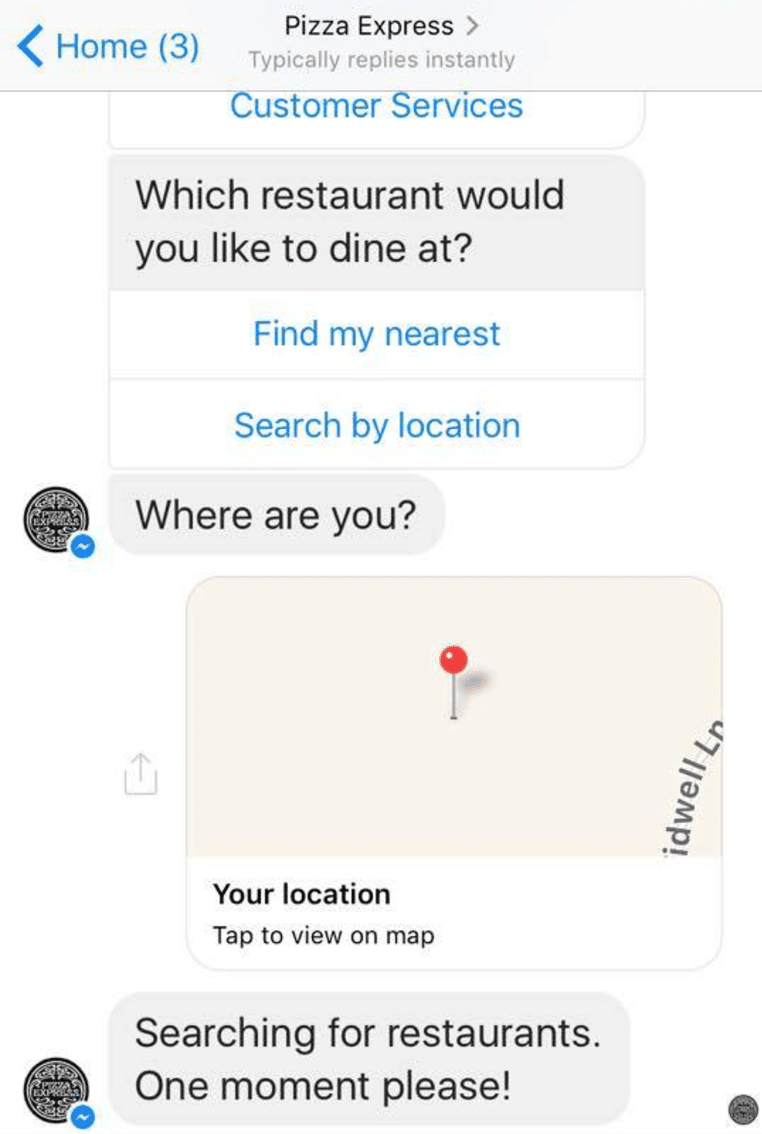
A restaurant chain uses a bot to help customers find the nearest local restaurant, book a table, and receive offers.
If that’s you – then please be prepared to change your mind! There are a number of different tools available now that will build a bot for you without you having to do anything more complex than type in some text!
One of these tools is called Manychat and it has a function that is just perfect for local businesses wanting to promote themselves in a new way. And that is – if you ask people to type a certain word in the comments under a post, they then get automatically subscribed to your Messenger bot and you can send them a freebie or a voucher.
Here’s an example used by a restaurant over the school summer holidays:
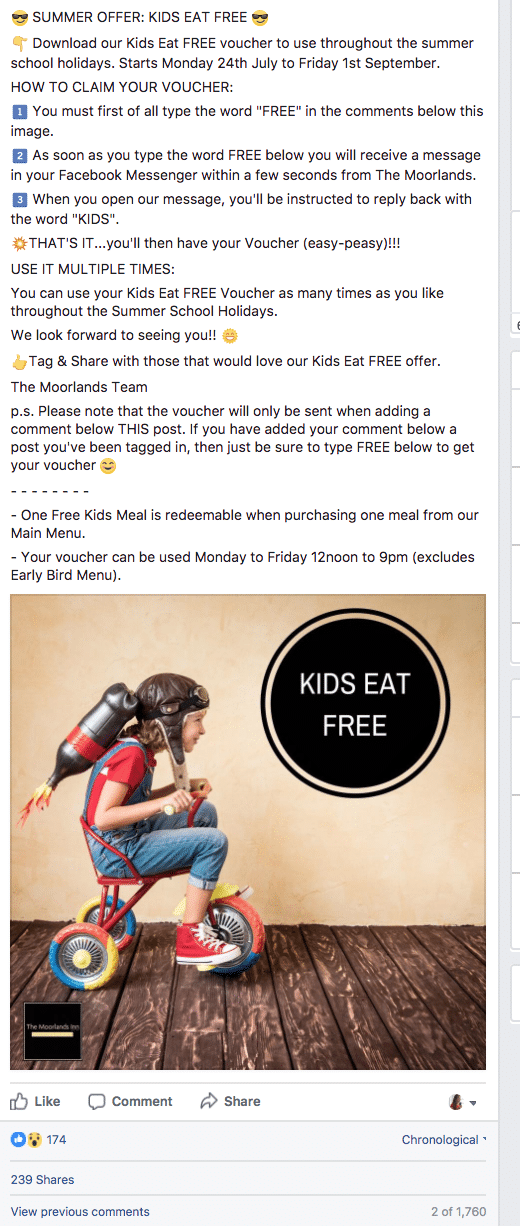
An independent restaurant used the Facebook Comments tool to offer a voucher to its’ customers. Note that the post tells customers exactly how to claim as for many people this might be the first time they have come across a Messenger bot.
Not only is this a great way to increase awareness and build goodwill, footfall, and immediate sales, but you have the added benefit of Messenger subscribers that you can continue to communicate with and an increase in engagement on your Facebook post! A definite win-win!
Setting this up for your business is very simple – first create a free Manychat account – then go to your dashboard and click on Growth Tools.
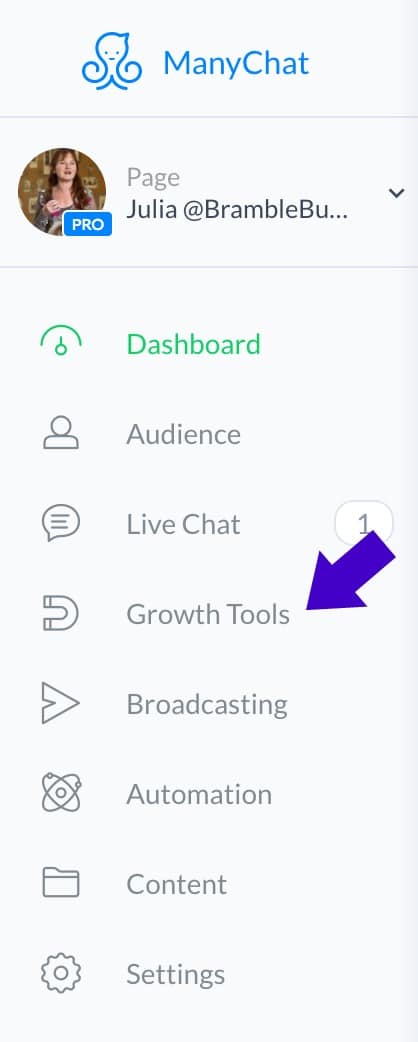
Create a Facebook comments promotion by first clicking on Growth Tools in the ManyChat dashboard.
Click on ‘New Growth Tool’ then choose ‘Facebook Comments’ from the next window:
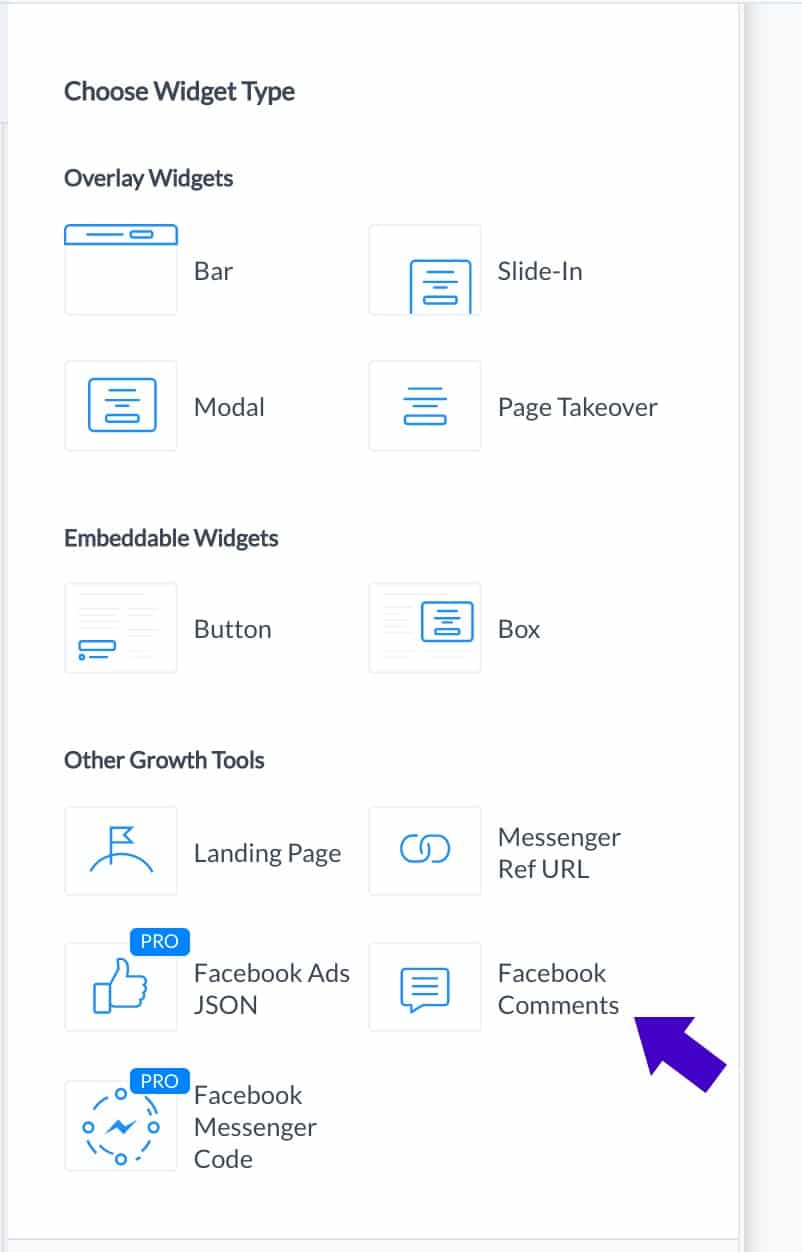
The Facebook Comments Tool is included in a free ManyChat account.
Select the Facebook post you want to activate (you can come back to this window later to select the post if you haven’t posted it yet!). Specify the keyword that you will ask your audience to type in the comments (keep this simple and include variants that you might expect, including typos!)
Save your work (then you will be able to edit the draft as much as you need to) and click on ‘Next’.
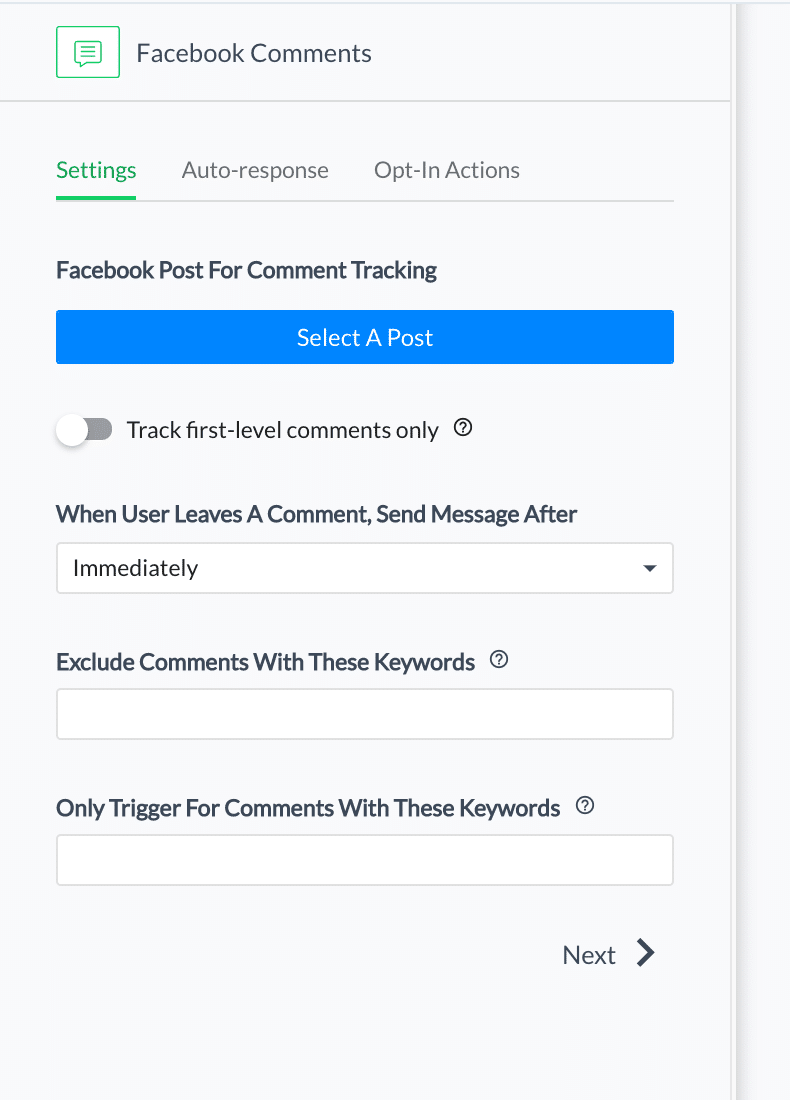
There are only a few steps to setting up a Facebook Comments promotion in ManyChat.
You then need to ask your visitors to reply, in order that they get subscribed.
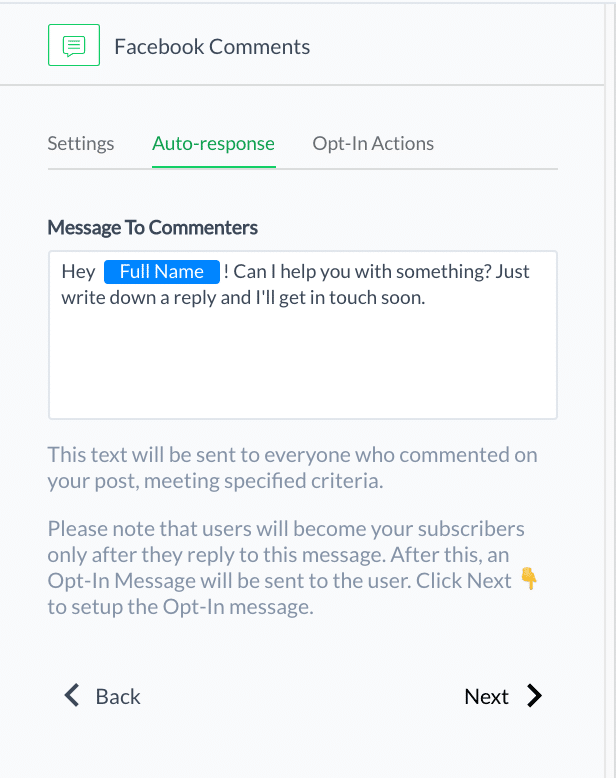
This is the default message that will be sent to everyone who comments with the specific keyword.
A generic message is auto-generated, but edit this to suit your business and customers.
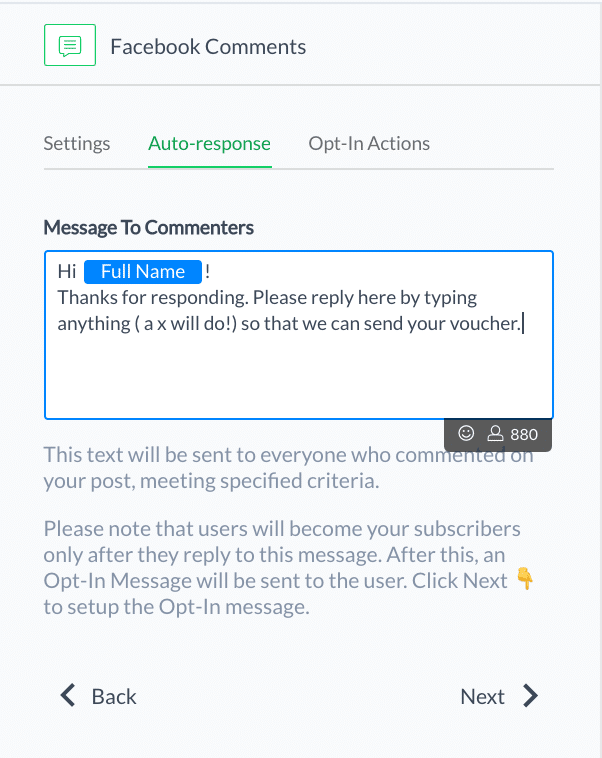
Customise the default message to represent your business and appeal to your customers.
Click on ‘Save’ again and then ‘Next’.
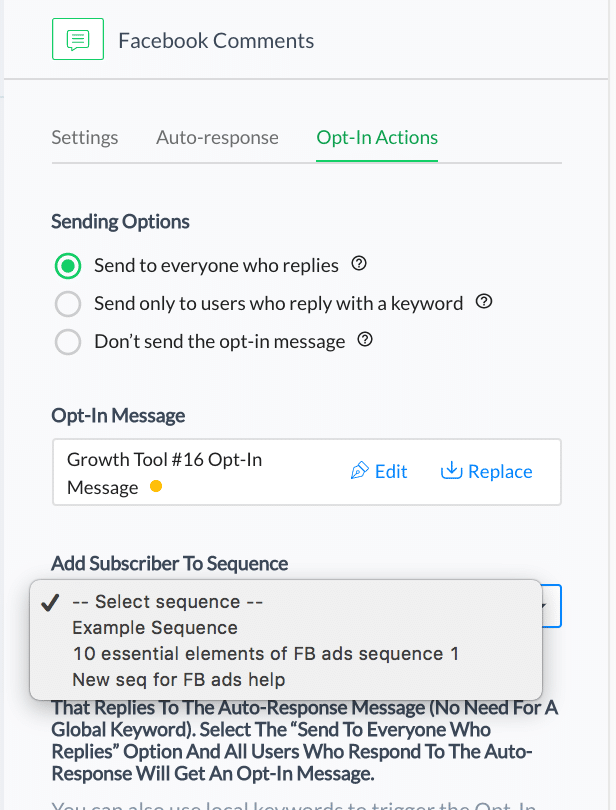
When new subscribers engage in ManyChat, you can add them to a Sequence.
Now, you will be prompted to create the first ‘real’ message for your subscribers – what’s referred to here as the ‘Opt-In Message.)
At this point you can also add them to a ‘Sequence’ – a series of messages that you can create within this tool to share tips, build relationships, and deliver information based on what your visitor really wants.
(For more information on building sequences check out this article .)
Edit the default message provided to suit your business and to welcome your new subscriber.
Deliver the voucher or offer code (either by attaching it as an image or by simply including a redemption code in the message) and tell them what to expect from you.
You also need to tell your subscribers how they can unsubscribe at any time – by typing ‘stop’ (this is a standard part of the ManyChat functionality.)
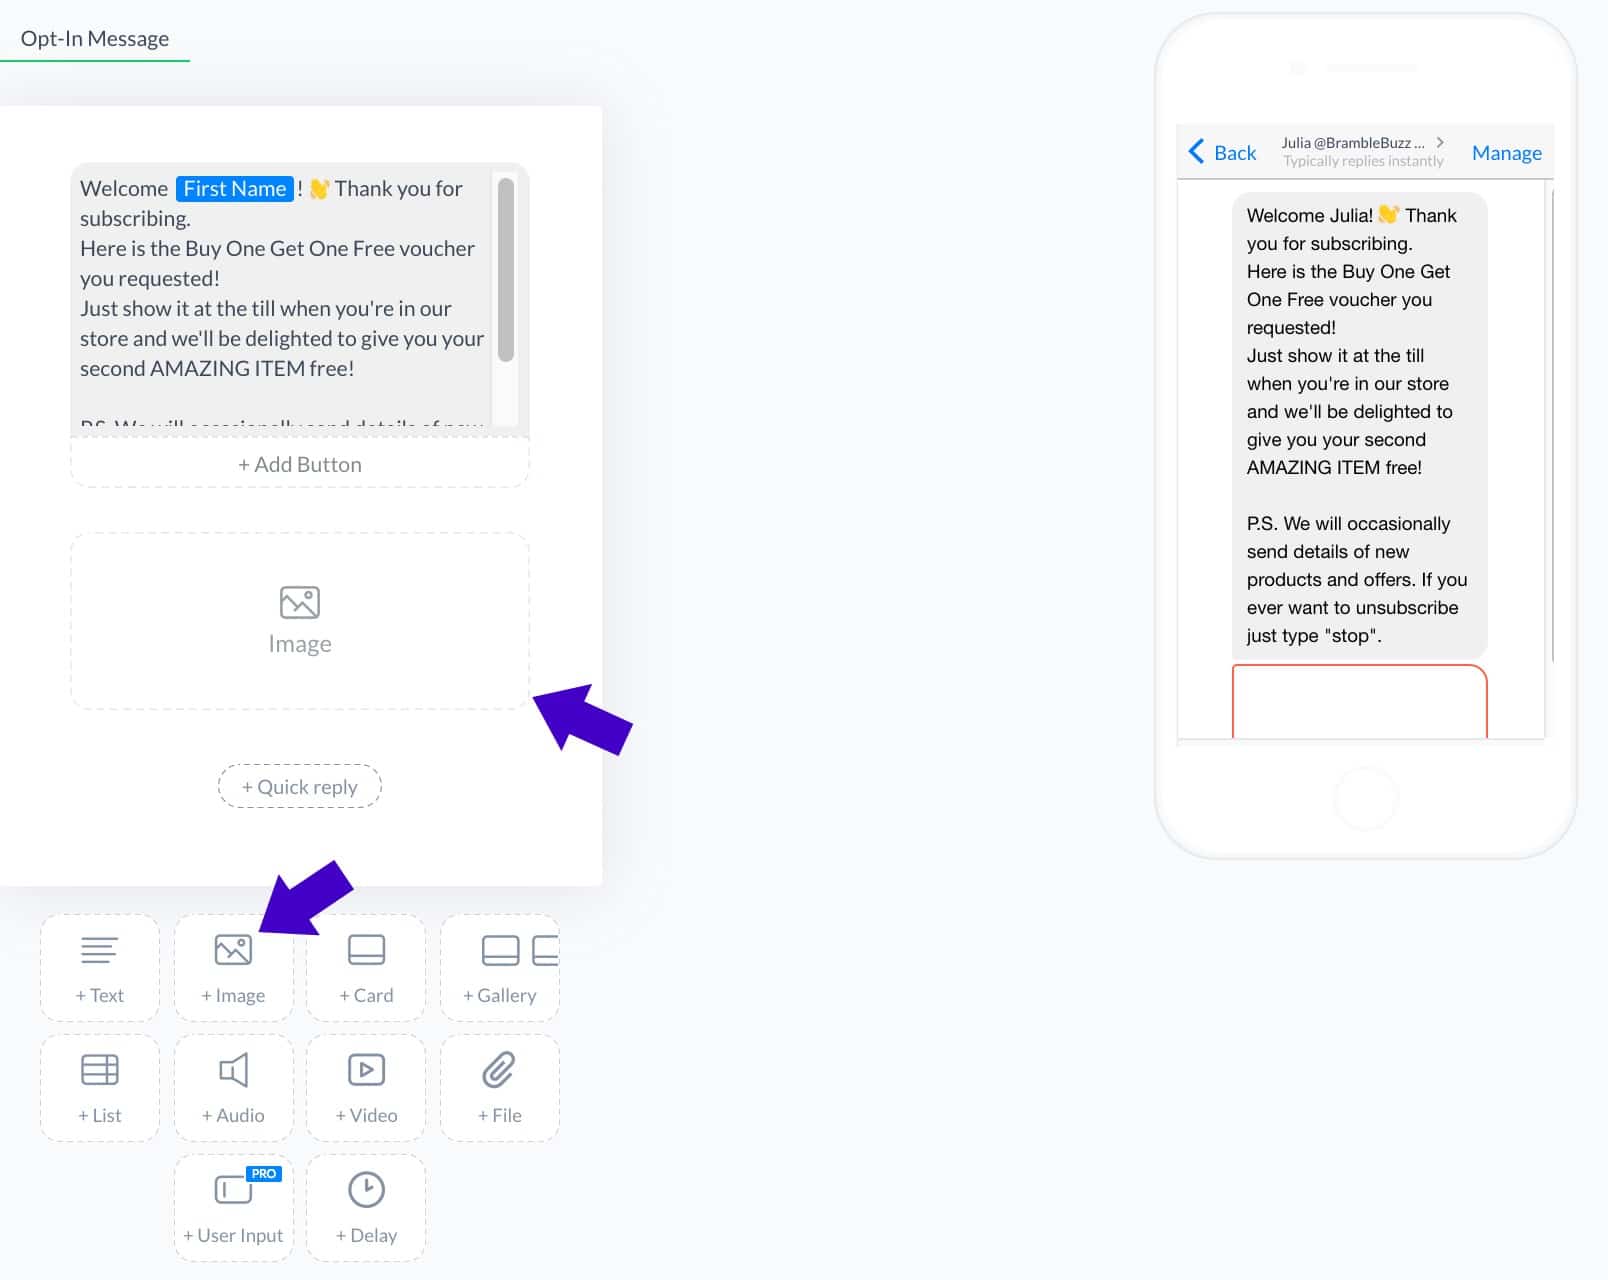
You can customise the welcome message to your new subscribers and attach a voucher as an image. Check the preview to ensure that the message looks OK.
The built-in preview allows you to see what your message will look like to the recipient.
When you’ve got everything set up as you want, and you’ve created a Facebook post that explains the offer and tells people what to do to claim it (as in the example above) – then you’re ready to hit the ‘Active’ toggle at the top.
And that’s it! You’re ready to grow a subscriber list within Facebook Messenger that you can go back and talk to at any time, plus you will increase footfall and sales with a new offer!
Combine this technology with a ‘boost post’ for even more impact – and just wait for things to really take off!
So there you have it!
3 simple yet massively effective Facebook marketing strategies for your local business. Which will you try first?
(This article first appeared on Social Media Examiner Oct. 2017.)